Lesson Plan: Collaborating in a Group on GitHub (3–4 People)
In this activity, a group of 3–4 learners will work together in one GitHub repository.
Each person will:
- Create their own branch.
- Add their own Markdown file.
- Open their own pull request (PR) into the
mainbranch. - Merge without causing any merge conflicts.
This activity follows GitHub’s shared repository workflow, where collaborators create branches in one repository and use pull requests to propose and review changes.
Helpful GitHub docs:
- About branches (docs.github.com)
- About pull requests (docs.github.com)
Instructions for Learners
Part A – Creating and Sharing the Repository
-
Person 1: Create a repository:
- Sign in to GitHub.
- In the upper-right corner, click your profile picture.
- Click “Your repositories”.
- Click the green “New” button.
- Give the repository a name:
our-collab-practice. - Select Private
- Check “Add a README file”.
- Click “Create repository”.
-
Person 1: Add learners as collaborators:
- On the repository page, click the “Settings” tab.
- In the left sidebar, click “Collaborators”.
- Click “Add people”.
- Type each group member’s GitHub username (for example
CindyLouWho) and invite them. - Learners must accept the email or web invitation (in notifications near the top right of each page) before they can push changes.
-
Persons 2- 4: Accept the invitation
- Open your email or GitHub notifications.
- Click on the invitation to join the repository.
- Click “Accept invitation”.
Part B – Open Web Editor and Create Your Personal Branch (Everyone)
You will create a branch that only you use.
- Open the web editor (github.dev)
- On your repository’s main page, press the
.(period) key on your keyboard. - A new tab opens showing a VS Code–like editor in your browser.
- If asked, sign in again and authorize.
- On your repository’s main page, press the
-
Create a new branch
- Look at the bottom-left corner of the web editor. You’ll see the current branch name (usually
main). - Click the branch name.
- In the small box that appears at the top, click “Create new branch…”.
- In the text box that appears, type your branch name. Use this pattern:
yourname-branch, for example:cindy-branchhorton-branchmartha-branch
- Press Enter.
- At the bottom-left, confirm it now shows your new branch name instead of
main.
- Look at the bottom-left corner of the web editor. You’ll see the current branch name (usually
You have now created your own branch, all work will be done on this branch unless otherwise indicated.
Part C – Create Your Personal Markdown File (Everyone)
To avoid merge conflicts, each person will create a different file name.
Make sure you are on your branch
- Look at the bottom-left corner of the web editor.
- You should see your branch name there, for example:
cindy-branch. - If it says
mainor something else:- Click the branch name at the bottom-left.
- A box appears at the top of the page with a list of branches.
- Click your branch name (for example,
cindy-branch). - Check again at the bottom-left to confirm it now shows your branch.
Create a new file
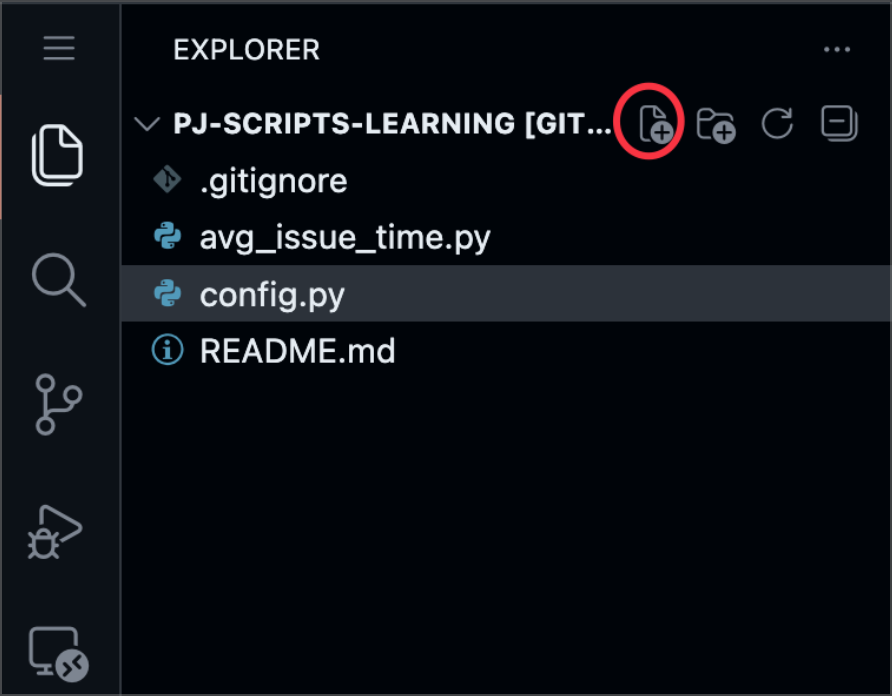
- In the Explorer panel on the left (the list of files), move your mouse into the empty space under the last file.
- Right-click in that space and choose “New File”
- ALTERNATE NEW FILE CREATION: There is a small icon that looks like a page with a plus sign on it. This will create a new file as well. Notice the other icons to the right of the circled one below. They are for creating new folders/directories, refreshing the file explorer, and collapsing all directories.
Name the file
- A small text box appears for the file name.
- Type a unique file name using this pattern:
yourname.md
Examples:cindy.mdhorton.mdmartha.md
- Press Enter on your keyboard.
- Make sure no two people use the same name.
Write some content in Markdown
-
After you press Enter, a blank editor opens for your new file.
-
Click inside the large editing area and type something like this (you can change it):
1 # About Cindy
2
3 - School you teach at
4 - Favorite "wake up" beverage
5
NOTE: the numbers are the line numbers. Do not type the numbers.
- Replace the word “Cindy” and the bullet points with your own information.
Commit the new file to your branch
- In the web editor, look at the left sidebar and click the Source Control icon, circled in the picture below.
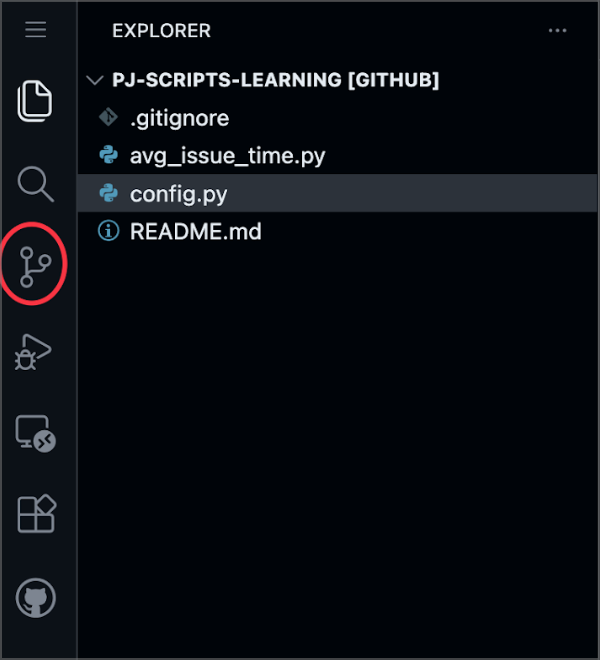
- At the top of the Source Control panel, you will see a box labeled “Message”.
- Below the message box, click the “+” (plus) icon next to “Changes” or next to your new file name to stage it.
- Click in the message box and type a short commit message, for example:
Add Cindy's file - Click the green “Commit & Push” button.
- A small message may appear asking if you want to stage and commit all changes; if it does, click “Yes”.
Your file is now commited on your personal branch, but it is not in main yet.
Part D – Check That Everyone’s Work Is Separate (Everyone)
As a group, quickly confirm:
- Everyone has a different branch name, for example:
cindy-branchhorton-branchmartha-branch
- Everyone has a different file name, for example:
cindy.mdhorton.mdmartha.md
- No one edited the same existing file (such as
README.md).
Because each person works in a different file on their own branch, Git will be able to merge all pull requests into main without merge conflicts.
Part E – Open a Pull Request (PR) for Your Branch (Everyone)
Now you will propose to merge your branch into main using a pull request.
-
Make sure you are on the repository page.
- At the top-left branch dropdown, confirm it shows your branch name (for example,
cindy-branch).
- At the top-left branch dropdown, confirm it shows your branch name (for example,
-
Open the “Compare & pull request” page:
- You might see a yellow bar near the top saying something like:
- “
cindy-branchhad recent pushes less than a minute ago” with a “Compare & pull request” button.
- “
- If you see this button, click “Compare & pull request”.
If you do not see the yellow bar:
- Click the “Pull requests” tab near the top of the repository page.
- Click the green “New pull request” button.
- On the left side (base), make sure it says:
- base:
main
- base:
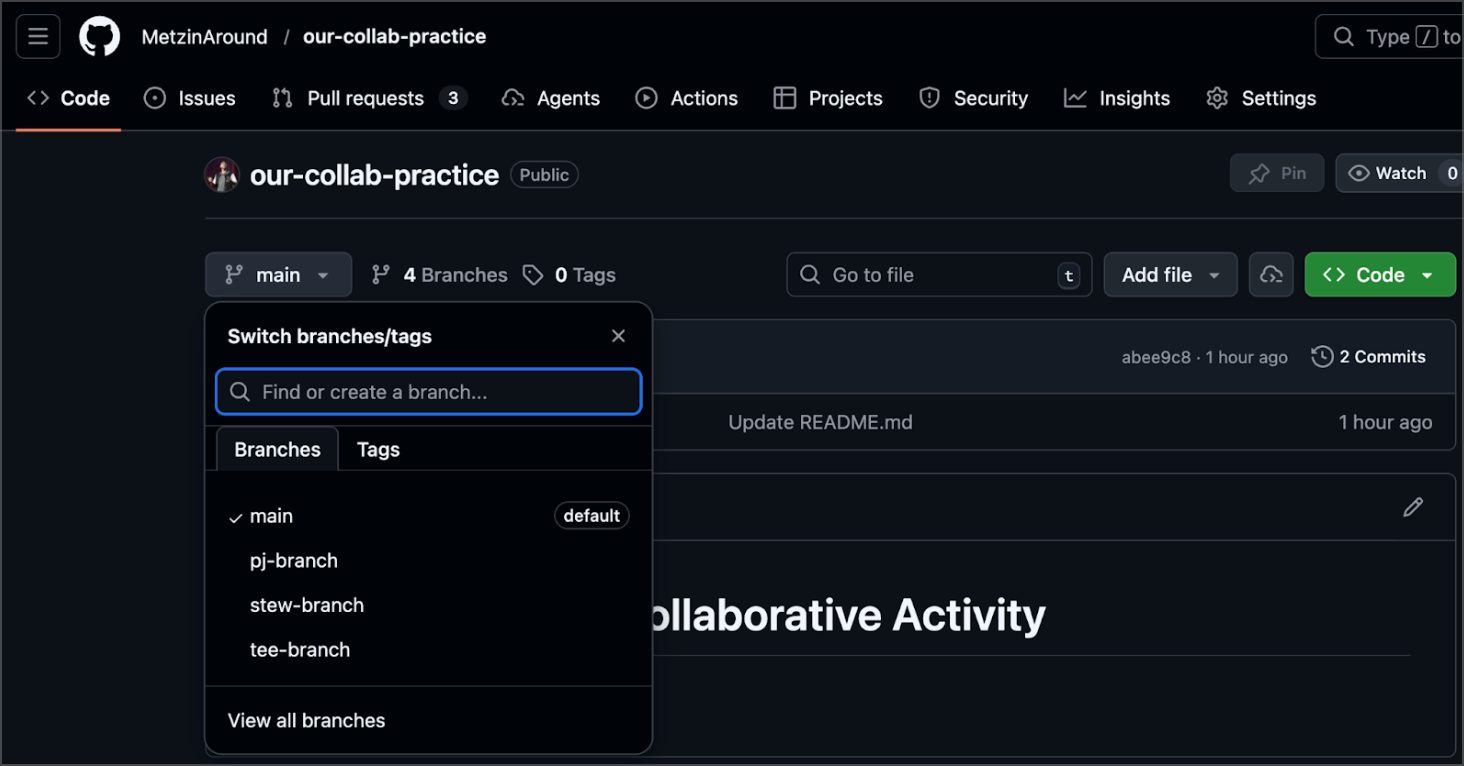
- On the right side (compare), open the dropdown and select your branch name, for example
cindy-branch.
- You might see a yellow bar near the top saying something like:
-
Fill out the pull request form:
- At the top, in the Title box, type a short title, for example:
Add cindy profile markdown file
- In the larger Description box, type a couple of sentences explaining the Pull Request.
- At the top, in the Title box, type a short title, for example:
REMEMBER: A typical Pull Request should include why the PR is being requested (“Don’t just say what, say why”), but for these assignments there’s no need for long descriptions.
-
Confirm which branches are involved:
- Near the top, it should say something like:
base: main←compare: cindy-branch
- This means you are asking to merge from your branch into main.
- Near the top, it should say something like:
-
Create the pull request:
- Click the green “Create pull request” button.
You have now opened a PR from your branch into main.
Part F – Review Each Other’s Pull Requests (Everyone)
At this point, you should be able to see everyone’s branches on the main page of the repo and everyone’s PRs.
Each group member should review at least one other member’s PR.
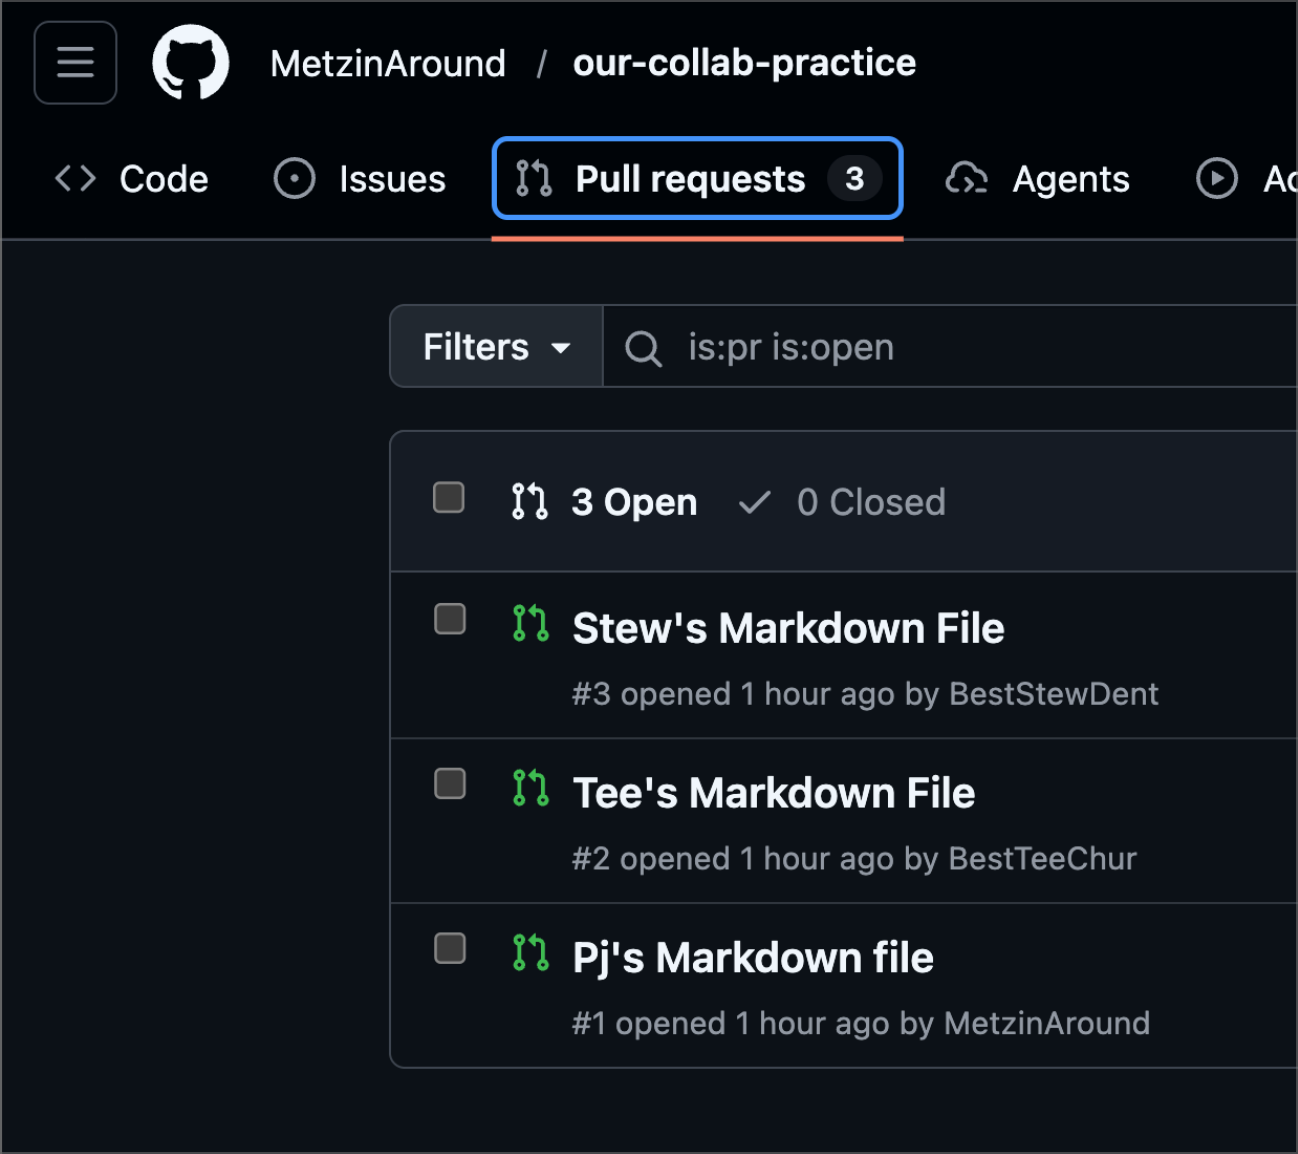
- Go to the “Pull requests” tab at the top of the repository.
- You will see a list of all open pull requests from your teammates.
- Each member of the group should review one other teammate’s PR.
- On the pull request page:
- Read the Title and Description.
- Click the “Files changed” tab.
- Scroll to see their Markdown file, for example
horton.md.
- Add a simple comment:
- At the top of the pull request, click in the “Leave a comment” box (or click specific line numbers in the file view and click the blue “+” to comment on a line).
- Add a comment.
- Click “Comment”.
- While still in the files changed tab, click
Review Changesto the right of the window. - Add a comment to the comment box and click
Approve
Part G – Merge Pull Requests Without Conflicts (Person 1)
Because each person created a different file, GitHub can merge all pull requests cleanly.
Choose the owner of the Repo to act as the merger.
They will merge each PR one at a time.
For each pull request:
- Go to the “Pull requests” tab.
- Click one open PR.
- Scroll down to the bottom of the Conversation tab.
- If everything looks good, click the green “Merge pull request” button.
- In the box that opens, click “Confirm merge”.
- Repeat this section for each team member’s PR.
Part H – Verify That Everyone’s Files Are in main
After all PRs are merged:
-
At the top-left branch dropdown, choose
main. -
On the main repository page, look at the file list.
-
You should see all Markdown files, one for each person:
cindy.mdhorton.mdmartha.md- (and so on)
-
Click each file to open it and confirm that the content is correct.
Best Practices and Tips
These are not strictly required to complete the activity, but they will help you as you continue to use GitHub.
-
One branch per task or person
- Use a separate branch for each feature or person.
- This keeps work organized and makes it easier to review.
-
Use descriptive branch names
- Instead of
test1, use:cindy-profile-pagehorton-update-readme
- This helps teammates understand what each branch is for.
- Instead of
-
Keep branches up to date
- On larger projects, if
mainchanges often, you may need to update your branch frommainbefore opening or merging a PR. (For this simple activity, we avoided conflicts by editing different files.)
- On larger projects, if
-
Clear pull request titles and descriptions
- Write titles that describe what the PR does:
- “Add cindy profile markdown file” is better than “Update stuff”.
- In the description, explain why you made the change, not just what you did.
- Write titles that describe what the PR does:
-
Review before merging
- Even simple changes should be quickly reviewed by a teammate.
- Look for:
- Typos.
- Missing information.
- Anything confusing.
-
Use the web editor for simple changes
- For quick edits like this activity, you can stay entirely in the GitHub web interface:
- Use “Add file → Create new file” and “Edit this file” buttons.
- You do not need to set up Git on your computer for basic practice.
- For quick edits like this activity, you can stay entirely in the GitHub web interface:
-
One PR should not touch too many unrelated things
- Try to keep each PR focused on a small, clear goal (for example, “Add my profile file”).
- This makes reviewing easier and reduces conflicts.
Extension Ideas (Optional)
If your group finishes early, try one or more of these:
-
Edit an existing shared file without conflicts
- As a group, open
README.md. - Decide on different sections for each person (for example, each person adds their name in a different bullet list).
- Each person:
- Creates a new branch.
- Edits a different part of the README.
- Opens a PR.
- Discuss what would happen if two people tried to edit the same line.
- As a group, open
-
Assign reviewers
- When creating a PR, use the “Reviewers” section on the right side to request a review from a specific teammate.
-
Practice closing a PR without merging
- Create a tiny change on a branch.
- Open a PR.
- Then click “Close pull request” instead of merging.
- Observe that the branch is still there, but the change is not in
main.
Learners who complete this activity should feel comfortable with the basic collaborative GitHub workflow: branches, Markdown files, pull requests, review, and merge—while also understanding how to avoid merge conflicts by organizing work clearly.