Build and Publish a Portfolio Site with Jekyll + GitHub Pages
You already created a GitHub Profile README to introduce yourself and share information about your interests. In this activity, you will build a separate portfolio website where visitors can explore the things you have made.
Your site will include:
- A home page that introduces you
- A Projects page for GitHub repositories and coding projects
- A Things I’ve Made page for blogs, videos, articles, websites, apps, designs, and other creations
- An About page with more information about you
You will use Markdown files and a pre-made Jekyll theme. You do not need to write CSS, install software, use the terminal, or learn Git branching and pull requests for this activity.
What You Will Learn
By the end of this activity, you will know how to:
- Create a Static Site using Jekyll and GitHub Pages
- Create pages with Markdown
- Use a configuration file to set up a Jekyll site
- Use front matter to control page titles and navigation
- Publish a static website with GitHub Pages
- Update your portfolio as you create new work
What You Should Already Know
This activity assumes you have completed the Creating Your Profile README on GitHub activity, or already know how to:
- Create a public GitHub repository
- Use the GitHub Web Editor
- Edit and preview Markdown
- Save changes to a repository
Part 1 — Create the Portfolio Repository
- Sign in to GitHub.
- Click your profile picture and choose Your repositories.
- Click the green New button.
- For Repository name, enter:
my-portfolio-site - For the description, enter:
A portfolio of my projects! - Select Public.
- Turn on Add a README file.
- No other options required.
- Click Create repository.
This repository will hold the files for your portfolio website.
Part 2 — Open the GitHub Web Editor
- Press the period key (
.). If the web editor doesn’t open, you can change the.comin your browser’s address bar to.dev. - If GitHub asks you to sign in to the web editor, follow the prompts.
- You should see
README.mdin the file explorer.
You can create and edit all of the site files in this browser-based editor.
Part 3 — Create the Site Configuration
As you know, before doing any new work on GitHub you should create a new branch to work in. Do that first!
Create a new file at the top level of the repository named exactly:
_config.yml
To create a new file, use the button in this image.
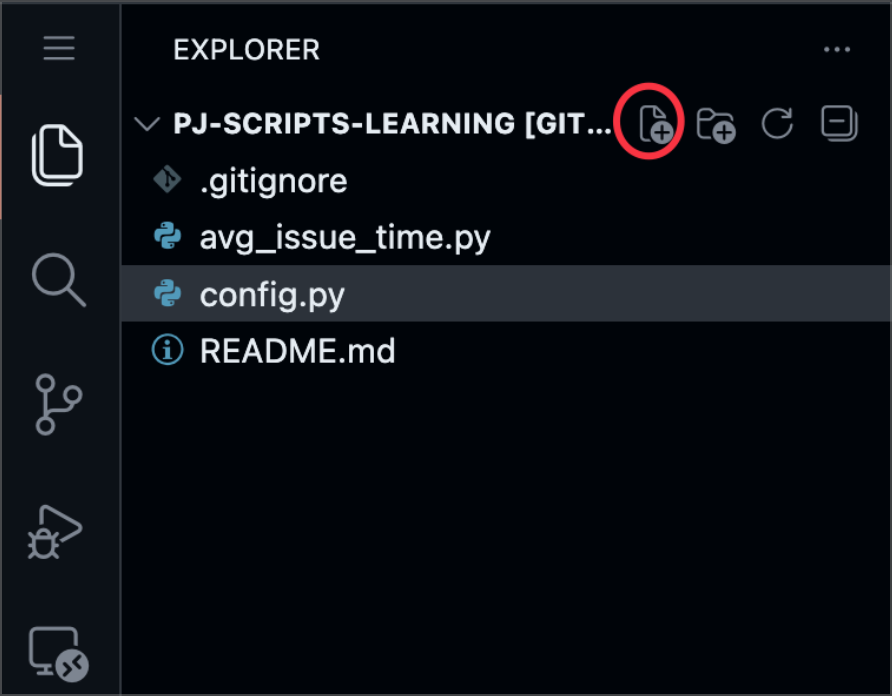
Paste this content:
title: My Portfolio
description: A portfolio of projects and things I have made.
url: "https://yourgithubusername.github.io"
baseurl: "/my-portfolio-site"

remote_theme: just-the-docs/just-the-docs

plugins:
  - jekyll-remote-theme
The configuration tells Jekyll the title and description of your website, as well as instructs it to use the Just the Docs theme. YAML is sensitive to spacing, so make sure the two spaces before - jekyll-remote-theme are preserved. Note that the baseurl needs to match your repo name exactly, and replace yourgithubusername in url with your GitHub username.
📖 Reference: Just the Docs
Part 4 — Create the Home Page
Create a new file named:
index.md
Copy and paste this starter content:
---
title: Home
layout: default
nav_order: 1
---

# Welcome to My Portfolio

Hi! I am **YOUR NAME HERE**.

This is my portfolio: a place to share projects, creative work, and other things I have made.

## Explore my work

- Visit [Projects](projects.md) to see coding and GitHub projects.
- Visit [Things I've Made](things-ive-made.md) to see blogs, videos, articles, websites, apps, and other creations.

I built this site with Jekyll and published it with GitHub Pages.
Replace YOUR NAME HERE with your name. Save the file.
The section between the triple dashes is called front matter. It gives Jekyll instructions about the page:
titleis the name shown in the navigation.layout: defaultuses the theme’s standard page layout.nav_ordercontrols the order of the pages in the sidebar. This will be represented with counting numbers.
Part 5 — Create the Projects Page
Create a new file named:
projects.md
Copy and paste this starter content:
---
title: Projects
layout: default
nav_order: 2
---

# Projects

These are projects I have worked on. Each entry should explain what I made and link to the relevant GitHub repository.

## Project Name

Describe what this project does, who it is for, or what problem it solves.

- **GitHub:** [View the project](https://github.com/YOUR-USERNAME/PROJECT-NAME)
- **Tools:** List the languages, frameworks, or tools you used.
- **What I learned:** Describe one skill or idea you practiced.

## Another Project

Add another project here, or remove this section if you only have one project so far.

- **GitHub:** [View the project](https://github.com/YOUR-USERNAME/ANOTHER-PROJECT)
- **Description:** Explain what visitors will find in the repository.
Replace the example content with a real project if you have one. If you do not have a project yet, leave the template in place and plan to update it later.
A strong project entry answers:
- What did you make?
- What tools did you use?
- What did you learn or accomplish?
- Where can someone view it?
Part 6 — Create the Things I’ve Made Page
Create a new file named:
things-ive-made.md
Paste this starter content:
---
title: Things I've Made
layout: default
nav_order: 3
---

# Things I've Made

This page collects work that does not fit neatly into a GitHub project. Add links to blogs, videos, articles, websites, apps, presentations, designs, tutorials, events, or anything else you have created.

## Blog Post or Article

Write a sentence or two explaining what this piece is about and why you made it.

[Read it here](https://example.com)

## Video

Describe what the video is about and what viewers will learn or see.

[Watch it here](https://youtube.com/)

## Website or App

Describe what the website or app does and who it is for.

[Visit it here](https://example.com)

## Something Else

Add another type of work, such as a presentation, design, tutorial, podcast, community project, or event.

[View it here](https://example.com)
Replace the example links with links to your own work. Delete sections you do not need and add more sections as your portfolio grows.
If you do not have work in every category, that is okay. A portfolio is a record of your growth, not a list of requirements to complete all at once.
Part 7 — Create the About Page
Create a new file named:
about.md
Paste this starter content:
---
title: About
layout: default
nav_order: 4
---

# About Me

My name is **YOUR NAME HERE**.

I am interested in **YOUR INTERESTS HERE**. I am learning **YOUR SKILLS HERE**, and I created this portfolio to share my work and track what I make over time.

You can find me on [GitHub](https://github.com/YOUR-USERNAME).
Replace the placeholder text with your own information. You can adapt details from your Profile README, but try to make this page connect your background and interests to the work in your portfolio.
Your site should now have these pages in this order:
- Home
- Projects
- Things I’ve Made
- About
Part 8 — Commit and Push
The web editor saves changes automatically, so you’ll need to commit your changes and push them. Stage all the new files and commit them to your repo with a message that details what was changed.
Before moving on, confirm that these files appear in the repository:
_config.yml
index.md
projects.md
things-ive-made.md
about.md
You can leave README.md in the repository. It is the repository’s description for people viewing the code; it is not one of the pages in your portfolio site.
Part 9 — Turn On GitHub Pages
- Return to your repository on GitHub.com. You can do this by clicking the blue “GitHub” button in the bottom left of your web editor, or by opening a new tab and navigating there yourself.
- Click Settings.
- In the left menu, click Pages under Code, planning, and automation.
- Under Build and deployment, set Source to Deploy from a branch.
- Select the default branch, usually
main. - Select the folder / (root).
- Click Save.
GitHub will now build your Jekyll site and publish it with whatever is pushed to Main. Right now, all your work is in another branch. Open and merge a Pull Request into main to see your site built.
📖 Reference: Configuring a publishing source for GitHub Pages
Part 10 — Visit and Test Your Site
- Open the repository’s Actions tab.
- Find the
pages build and deploymentworkflow. - Wait for the workflow to finish.
- Return to Settings → Pages.
- Click the link under Your site is live at.
Click your site and click around to see all the pages you’ve made.
Part 11 — Customize Your Portfolio
Spend the rest of the activity making the site feel like yours. Choose at least three of these tasks:
- Add a real GitHub project to Projects.
- Add a blog post, video, article, website, app, or other creation to Things I’ve Made.
- Experiment with different markdown elements like tables or images.
- Add a
resume.mdpage with a link in the navigation. - Try out other free themes from Jekyl
Whenever you make changes to the main branch, your site will update after some GitHub Actions run. Wait for GitHub Pages to rebuild and then refresh the live site.
Troubleshooting
| Problem | What is probably wrong | How to fix it |
|---|---|---|
| The site has no sidebar or styling | _config.yml has a typo, incorrect indentation, or the wrong filename |
Compare it with Part 3. Make sure the filename is exactly _config.yml. |
| A page shows 404 Not Found | The filename or link is incorrect | Check spelling, capitalization, and the .md filename. |
| A page is missing from the sidebar | Front matter is missing or incomplete | Confirm the page starts with --- and includes title, layout, and nav_order. |
| A portfolio link does not work | The example URL is still present or the URL has a typo | Replace it with the complete URL to your work. |
| The site has not updated | GitHub Pages is still building or the browser cached the old version | Wait a few minutes, then refresh. Try Ctrl+Shift+R or Cmd+Shift+R. |
| The Actions workflow is red | The Jekyll build failed | Open the failed workflow and read the error message. It usually identifies the file or setting that needs attention. |
Portfolio Tips
- Focus on work you are proud of, even if it is small.
- A short explanation is more useful than a link by itself.
- Say what you contributed when a project involved other people.
- Include unfinished or experimental work if you explain what you are learning.
- Keep links up to date.
- Add new work as you make it.
- Do not publish private information such as your home address, personal phone number, passwords, or private API keys.
- Your portfolio can grow over time. It does not need to be complete today.